Orange Chiffon Cake and Lemony Buttercream

ImageThis recipe is a bit more complicated than I usually post but it makes up for that in light and fluffy deliciousness. This cake could be for anything, a birthday, an anniversary, a new job, a good day, a bad day, seriously ANYTHING! I got this recipe and changed it from the Joy of Cooking. 


Orange Chiffon Cake:

1 cup. Rice Flour

1 cup. Potato Flour

1/4 cup. Tapioca or Potato Starch

1 1/4 cups. Sugar

1 tbsp. Baking Powder

1 tsp. Salt

5 Egg Yolks

3/4 cup. Freshly Squeezed Orange Juice

1/2 cup. Vegetable Oil

2 tbsp. Orange Zest

1 tsp. Vanilla

8 Egg Whites

1/2 tsp. Cream of Tartar

1/4 cup. Sugar


Preheat oven 325°F. Grease and line two 8-inch pans. Sift flours into a mixing bowl. Add and combine sugar, baking powder, and salt. Add egg yolks, orange juice, vegetable oil, and orange zest, beat on high speed until smooth. In another bowl beat and with clean beaters, beat egg whites and cream of tartar until stiff (I seriously mean stiff and no longer glossy). Then stir sugar into the egg whites. Add one-quarter of the egg whites to the other mixture and fold it in. Add the rest of the egg whites and fold in until smooth. Be gentle with this. Put half of the batter into each pan and bake for 35 minutes or until an inserted toothpick comes out clean. Let it cool completely before cutting each cake in half.


If I had a secret recipe this would be it. But because I am so into you guys, I will share.


Lemony Buttercream Frosting:

2 cups. Unsalted Butter (1 pound)

1/4 cup. Cream

3 cups. Icing Sugar

1 tbsp. Lemon Juice


Add butter, cream, and half the icing sugar to the mixer. Beat on high until it is nice and fluffy. Add the rest of the icing sugar and check the consistency. If it is too thick add more cream. If it is too runny add more icing sugar. Then take 1/4 cup to a different bowl. Microwave it for about 20 seconds and then add to the big bowl of icing. When I had my icing crisis, I found that this trick actually makes the buttercream, so light and smooth. Mmmm!

Then you know what you do… you frost the cake. Assemble the cake and spread icing between the layers. Then do a crumb coat. (A thin layer to seal in the crumbs.) Put it in the fridge for fifteen minutes. Add a thicker coat of icing. Press coconut onto the outside and pipe rosettes on the top.


Final step is to eat this entire cake because it’s that good! Don’t you dare share it either. Well that’s not actually what I did; but I wouldn’t judge you if that’s what you did.


I seriously want to know what you think of this recipe, so bake it and get back to me. If you think it’s too hard, it’s not. You can do it!


Enjoy!

Uber Delicious post from Katie Anderson

This week is special and I have a Guest Blogger! Yay.

Readers, I would like to introduce Katie Anderson.

*Applause*

*Applause*


“It is Autism Awareness Month and so to commemorate I made cookies shaped like puzzle pieces.  The puzzle piece is the Autism pride simple, symbolizing the diverse and mysterious nature of Autism.  

Autism awareness is month is a special opportunity to educate the public about what is new in the Autism community.  For information on the events currently happening in Edmonton, check out the Autism Society of Edmonton Area.  April is also a good time to bake some lovely sugar cookies.  For a great recipe that delivers delicious cookies that are chewy with a hint of vanilla, see below.

Recipe courtesy of allrecipes.ca

Image


Ingredients:

1 1/2 cups. Butter, softened

2 cups. White sugar

4 eggs

1 tsp. Vanilla extract

5 cups. All-purpose flour

2 tsp. Baking powder

1 tsp. Salt

Directions: 

In a large bowl, cream together butter and sugar until smooth. Beat in eggs and vanilla. Stir in the flour, baking powder, and salt. Cover, and chill dough for at least one hour (or overnight).

Preheat oven to 400 degrees F (200 degrees C). Roll out dough on floured surface 1/4 to 1/2 inch thick. Cut into shapes with any cookie cutter. Place cookies 1 inch apart on ungreased cookie sheets.

Bake 6 to 8 minutes in preheated oven. Cool completely”


Thanks to Katie for an awesome post! Let us know what you think of the recipe. 


Molten Chocolate Lava Cake  

ImageYesterday I had the urge to bake, and because I mentioned lava cakes in the last blog post, my roommate, Cameron requested it. This recipe is lactose free and can be gluten free. I made this gooey, decadent dessert in about half-an-hour. Serving each cake with a big scoop of creamy, vanilla ice cream. (Obviously it won’t be lactose free anymore.) In these posts I usually try to be humble, but honestly it was delicious, try it!


Recipe is adapted from Michael Smith


Ingredients:

8 ounces Semi-Sweet Chocolate
1/2 cup. Butter (softened)
2 tbsp. Cocoa Powder
4 Eggs
1/4 cup. White Sugar
1 tbsp. Vanilla Extract

1 tbsp. Flour (Gluten Free or Wheat)
Butter for greasing
White sugar for sprinkling on ramekins
Ice cream, for serving


Directions:

Serving: Makes 5-7 cakes

Preheat your oven to 400°F.

Melt the chocolate and butter in a heatproof bowl set over a pot of simmering water, stirring until they melt. Remove from heat and sift in the cocoa powder, stirring until smooth.

Meanwhile, beat the eggs, sugar, flour, and vanilla until they are thick and smooth. Pour in the melted chocolate and stir until smooth.

Grease each ramekin or muffin tin. Lightly sprinkle each with white sugar and shake to coat the inside, shaking out any excess. Evenly divide the cake batter among the ramekins.

Place on a rimmed baking sheet and bake until the batter rises, the tops are cracked, and the insides are still a bit gooey. Bake for approximately 10-15 minutes.

Cool for a few minutes. Run a knife around the edges of the cakes to loosen them. Carefully invert onto a plate. Serve with lots of whipped cream or ice cream.


Seriously, if you don’t try any recipes from my blog, try this one! It’s easy, allergy friendly, and delicious.

Oatmeal Chocolate Chip Cookies (Gluten, Nut, Dairy Free)  

ImageThis past week I have been feeling like I eat too much of my baking without working it off. I keep choosing TV over the gym. What on TV you ask? Survivor, naturally. I sit on my comfy couch, while I watch people work hard and starve. I decided that because I keep doing that, my baking would have to be healthier for now. Oh what a struggle. No lava cakes, crème brûlée, brownies, or tiramisu. *Sigh!*

I made these cookies in an effort to make something I wouldn’t want to eat. It didn’t work! These cookies are great. They are crisp on the outside, gooey on the inside. The sweetness of the cookie is balanced well with the bit of salt. The coconut oil makes for a nice base flavor. I had to give the cookies away so I didn’t eat them. If that isn’t a first world problem, I don’t know what is!


Recipe adapted from Summer Harms Blog


1/2 cup. Coconut oil, softened

1/2 cup. White sugar

1 Egg

1/2 tsp. Vanilla extract

3/4 cup. Brown rice flour

1/2 tsp. Baking soda

1/4 tsp. Sea salt (heaping)

1 tsp. Cinnamon

1/2 tsp. Nutmeg

1 1/2 cups. Rolled oats (gluten free)

3/4 cup. Chocolate chips (milk free)


Preheat oven to 350º. In a large bowl, cream together the coconut oil, sugar, egg, and vanilla until smooth. In a separate bowl, whisk together the flour, soda, salt, cinnamon, nutmeg, and oats. Mix dry ingredients into the wet, and stir in the chocolate chips.


Drop 1-2 inch balls of cookie dough on a parchment lined baking sheet and flatten. Bake for 10-12 minutes, and then let sit on the hot pan for a few minutes more before transferring to a cooling rack. Makes about 20 cookies.


If you want to make this vegan friendly, you could switch the egg for 1/3 cup of mashed banana.


I loved these cookies! Give them a try and let me know what you think.

Fabulous Flour

flour

Today I want to talk about gluten free flour. There are many types of gluten free flour, but the most commonly used is rice flour. When you substitute one type of flour for another, it doesn’t work well. Rice flour is a common alternative, but it is the flour that has a gritty texture. I have found personally that the only way to make gluten free all-purpose flour is a combination of flours and starches. As well for many recipes adding xanthan gum is useful. What I recommend doing is making a big batch of gluten free flour and then using it just as you would regular flour.

Gluten Free All-Purpose Flour:

6 Cups. White Rice Flour

2 Cups. Potato Starch.

1 Cup. Tapioca Starch of Flour

2 Tbsp. Xanthan Gum


I hope you guys think this works as well as I do. What do you use as a alternative to wheat flour?


Image courtesy of: Sweetlyvegan

Cinnamon Apple Crisp (Gluten Free Option)

Image
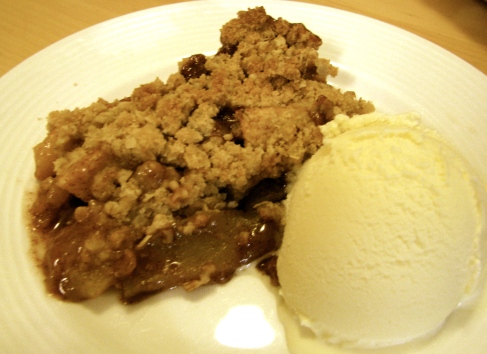
Apple anything is always a big hit in my house—apple crisp especially. When I was a kid, my Grandma would make it for us and I always loved it. My family always said that I could never make it better than hers, and anytime I used her recipe I didn’t make it better. I decided to stop trying to beat her at her own game and I came up with my own recipe.

I love this recipe! The apples have a gooey caramel-type sauce. It’s not too sweet. The crumble on top is crunchy and compliments the apples nicely. I also think this is one of the easiest apple crisp recipes, because it doesn’t involve cutting the butter in, just pouring the melted butter.

I hope you love it as much as I do!

8 Apples, peeled and sliced (I recommend Granny Smith, Gala, or Macintosh)

1 Cup. Brown Sugar

1 Tbsp. Cinnamon

1/2 Tsp. Nutmeg

1 Tbsp. Flour (Can use a gluten free substitute, like Cup4Cup)

1/4 Cup. Lemon Juice

1/4 Cup. Hot Water

1 Cup. All-Purpose Flour (Can use a gluten free substitute, like Cup4Cup)

1 Cup. Oats (Can use gluten free)

3/4 Cup. Brown Sugar

1/4 Tsp. Baking Soda

1/4 Tsp. Baking Powder

1/2 Cup. Melted Butter

Preheat oven to 375 degrees. Place peeled and sliced apples in a 9×13 baking dish. In a measuring cup add brown sugar, cinnamon, nutmeg, flour, lemon juice, and flour, and then stir. Then add hot water and mix until smooth. Pour brown sugar mixture over the apples and mix it up. In a separate bowl add flour, oats, sugar, baking soda, baking powder, and stir. Drizzle the melted butter over the mixture slowly stirring as you do so. The mixture should look like course crumbs or just small clumps of yumminess. Sprinkle the flour mixture over the apples and put it in hot oven for 35-40 minutes. Remove when topping is golden brown and apples are soft.

Eat it while it’s still warm and it is FANTASTIC (especially with ice-cream). The next day it is still great too, the flavours have had time to really combine and intensify.

What do you think of this recipe?

Extreme Baking

Yesterday I got home from the store and saw two of my roommates playing soccer in the kitchen. First of all, who plays soccer in the kitchen?? Second of all, I hope my landlord doesn’t read this… Oh well, nothing was damaged (except my legs).

I was inspired to make cookies from my conversation with Devin Smith a few days ago, so I asked if I could bake while they pass. I began making chocolate chip cookies and I swear I have never had such a challenge. Walking between the sink to the counter, or going to get something from the cupboard led to me getting hit by the soccer ball more times than I can count. At one point I turned around and stepped directly on the ball. Honestly, although it made baking difficult, it was hilarious! What a wacky group people living in this house.

The cookies actually turned out great. They were golden brown, gooey, and chocolatey. I used the original Nestle Tollhouse cookie recipe. Yumm!

Image

What a ridiculous way to make cookies, but it worked out. Maybe you guys should do some extreme baking.

Image

Let me know what you think. Ever baked in a strange place or way?

For the Love of Baking

Today I want to talk about why I love baking. I have always loved ice cream, cake, chocolate, cookies, and all thing delicious (except donuts, I don’t like donuts). In addition to my love of sweets, I find baking to be an escape. I began baking when I was seven. At this point in my life, chaos was everywhere. My dad had just passed away and grief surrounded my family. Each of my siblings had their own unique way of coping, and mine soon became baking. I would bake with my Grandma and my Auntie. (For those who wonder, why not my mom? Well… she burns things.) And no, not baking in an Easy-Bake Oven, in the real thing. I usually had supervision and support; but I was also allowed to do my own thing. I found, and find, that while I am in the kitchen creating something, I am at peace. I use that time to think and reflect. Or sometimes I use that time to avoid thinking and just focus on the task I have–escaping to a place where everything is ok. I’ve heard many people say that baking is too particular, and they would rather just throw some food in a pot and call it soup, which I get. I mean baking does require some sense of how much ingredient is needed. But what they are missing is the way it all works together. I love how no matter what, if you at egg yolks to hot milk, it will thicken. If you add baking soda to dough, it will rise. Every ingredient has a purpose and it is how they all react to each other that makes the end result. The connectivity of a recipe and how you can personally shape it to be whatever you want is what I love about baking. 


What helps you escape? What do you love/hate about baking?

Healthy Chocolate Oatmeal Cookies

IMG_8398

Since I started this blog, I had several people ask me for healthy baking ideas. Why? I have no clue—a balanced diet or something. Originally I was not excited to pursue this, I would rather be baking sinful, melt-in-your-mouth brownies. But I decided to look into treats that wouldn’t show up on your bathroom scale. I began on pinterest and quickly found TheSkinnyFork.com, a blog with these wonderful cookies. I altered the recipe a bit, but not much; the credit really should go to Amanda Plott, for creating these magical morsels. They are lactose free, oil free, egg free, gluten free and DELICIOUS! I was concerned that you would taste the applesauce, but you definitely can’t. This is probably my new favourite recipe.

 Ingredients:

2 Ripe Bananas, Mashed

1/3 cup Reduced Fat Nut Butter (Almond, Cashew, or Peanut Butter)

2/3 cup Unsweetened Applesauce

1 tbsp. Honey

1 tsp. Vanilla

1/2 tsp. Salt

1/2 tsp. Cinnamon

Dash of Ground Cloves

Dash of Ground Nutmeg

1 1/2 cup Quick or Old Fashioned Oats (Can use gluten free oats)

1/4 cup Unsalted Cashews, Peanuts, Pecans, or Walnuts

1/3 cup Semi Sweet Chocolate Chips

1/4 cup Reduced Fat Unsweetened Shredded Coconut

Directions:

Preheat the oven to 350 degrees F. Line a baking sheet with parchment paper and set aside. Mix together the bananas, nut butter, applesauce, honey, vanilla, and spices.  Add in the oats, nuts, chocolate chips, and coconut; stir until well combined.

Scoop rounded 2 tbsp. of the cookie dough onto baking sheet, leaving an inch or two between each and flatten slightly. Place a few more chocolate chips on top of each cookie. Bake for 20-30 minutes and allow to cool. Store in air-tight container.

Approximate Nutritional Values
Servings: 18 • Size: 1 Cookie • Calories: 99.3 • Fat: 5.1 g • Carb: 12.3 g • Fiber: 1.6 g • Protein: 2.9 g • Sugar: 4.4 g • Sodium: 91.1 mg

Salt in Baking—Necessary?


Image

 I have been baking since I was seven-years-old. That means I have been baking for more than half my life. I love it; but I have made my fair share of mistakes. (Shocking, I know.) One the mistakes I made the most often is leaving out the salt. I know that it has a bit of a bad reputation. And therefore you should be mindful of how much salt you’re adding to your baking, but unless you have a low sodium diet don’t omit it entirely. Salt is a key ingredient. In buttery dough, it makes it crispier, more brown, and less oily. In bread dough, it controls how much the dough rises and strengthens the elasticity of gluten. Salt also adds days of shelf life to your baking. Most importantly, it improves flavour (especially with chocolate). Salt contrasts with the sweetness to add complexity. Too sweet is not desirable; it adds balance to your baking. Salt takes your baking from meh to mouthwatering!


An awesome blog with more info: PIECEofCAKE

Do you add salt to your baking? Are there any other ingredients you want to know more about? 

Photo From: http://www.alibaba.com/